Schedule and Host Zoom Meetings

Schedule a Meeting
You can use the "New Meeting" button to launch a spontaneous, instant meeting at any time, but Zoom also lets you schedule meetings in advance through the VCU Zoom portal or the desktop app.
Simply click on "Schedule" and enter a meeting title, date and start time to add your event and receive a link to share with guests. Additional settings let you decide who can be seen and heard, whether you want the meeting to be automatically recorded, and more. You can also create a "recurring" meeting that repeats as often as you wish.
This video will walk you through the process:
Remember it's always good practice to apply a passcode and/or Waiting Room to keep your meetings secure. See "Privacy and Security" for more information about Zoom's many security features.
Zoom meeting controls can be found in the bottom toolbar of the application window with a meeting in progress. Note that due to space limitations, some functions may be grouped under the "More" heading to keep things tidy. You can customize your toolbar by moving the shortcut icons into or out of the "More" folder depending on which ones you tend to use the most.
Zoom offers a tutorial video explaining how to navigate the user interface:

Here's a sample of the controls you'll find on the bottom toolbar:
| Toolbar Icon | Function |
|---|---|
 |
"Audio" lets you choose an installed or connected microphone to use in your meeting, mute or unmute your sound and adjust your volume. |
 |
"Video"controls lets you choose an installed or connected webcam, send or hide your video, touch up your appearance, compensate for low light and/or apply virtual backgrounds, filters and avatars. |
 |
"Share" lets you display various forms of content for collaboration and discussion, including your full desktop or individual applications, a second camera, or video or audio files. Advanced controls let you decide whether your guests can share as well, or contribute to real-time annotation of your shares. |
 |
"Participants" displays a list of who's currently in your meeting. An "invite" button lets you add more guests. Other controls let you promote individual participants to co-hosts, mute their audio or video, move them to the waiting room or eject them. |
 |
"Host Tools" provides quick links to all your security settings, including but not limited to removing participants, muting participants, locking the meeting, creating a new waiting room and granting or removing your guests' ability to unmute themselves, share content, make recordings, etc. |
 |
"Record" saves an MP4 file of your meeting to your computer or the Cloud. An indicator will flash to let your guests know a recording is in progress. |
 |
"Show captions" displays closed captions in real time for greater accessibility. Each participant can customize their own display to see the captions in the size and color that works best for them. |
 |
"Chat" launches a window for text-based conversations during your meeting. As the host you can decide who gets to participate and whether they can communicate with the entire group or only with you. |
 |
"Whiteboards" lets you start and share a new whiteboard or access an existing whiteboard from your library. Multiple templates are provided including org charts, Venn diagrams, maps and more. Depending on your settings, participants can annotate on the boards in real time and save them. |
 |
"Breakout Rooms" lets you split your participants into sub-groups for side discussions. As host, you can enter and leave any breakout room to see how things are going. You can also send voice- or text-based messages to any or all rooms. |
 |
"Polls/Quizzes" lets you launch a pre-made poll or create a new one with the meeting in progress. Various questions formats are supported, including multiple choice, matching, rankings and short and long answers. |
 |
"Reactions" lets you send non-verbal feedback in picture form to reward presenters with applause or a thumbs-up, cue them to speed up or slow down, or raise your hand to ask a question. |
 |
"More" is a "catch all" folder with all the icons that wouldn't fit in your toolbar. Look here for anything you don't see right away. Drag out your favorite icons to add to the toolbar and place less-needed icons into the folder to save space. |
In the course of a meeting you may find there are times you'd like your camera image hidden or your microphone audio muted. You can use the "Audio" and "Video" controls to mute and unmute as often as you see fit.
Note that the meeting host can mute one or all participants at any point during the meeting. However, only you can decide whether you want to unmute your camera and microphone, since Zoom will honor your desire for privacy.
If you're muted either by yourself or the host and the host wants to see or hear you, they can send a message asking you to turn on your camera or microphone, but it's up to you whether to consent.
This video provides an overview of Zoom video and audio settings and operations:
The "Share" icon in the meeting toolbar lets you share content from your computer (slideshows, images, videos, documents, web pages, etc) with your meeting guests. You can share your entire desktop or select a specific open application. You may also choose to share an interactive Whiteboard.
Be sure to look for the checkbox that allows you to include audio in your shares, if applicable. By default, Zoom will avoid sharing audio to eliminate system sounds, notification chimes and other unwanted audio from your computer, but when sharing videos, sound clips, etc you'll want the audio to come through. Also note that under the "Advanced" tab is a choice for "Video," allowing you to use Zoom's native video player instead of a third-party app like VLC player, Windows Media Player, Quicktime Player, etc. When using Zoom's player, audio will be included by default.
This video provides more details on the "Share" feature:
Captions and Live Transcription in Zoom
Closed captions can be generated in real-time for any VCU-hosted Zoom Meeting. Users are encouraged to make use of this feature to create a more inclusive and accessible experience for participants.
By default, closed captioning capabilities are enabled for all VCU Zoom users, but as the meeting host, you still need to initiate them during the meeting. Just choose "Show Captions" from the Zoom toolbar and indicate the language that will be spoken in the meeting, so Zoom knows what to listen for.
If your participants can't see the captions, ask them to click on "More" and choose "Display Subtitles".
If yu want to change the size or color of the captions, you can do so by using the caret next to the "Show Captions" button to access "Caption Settings".
Use the slider control to see a preview of the font size and choose what works best for you.
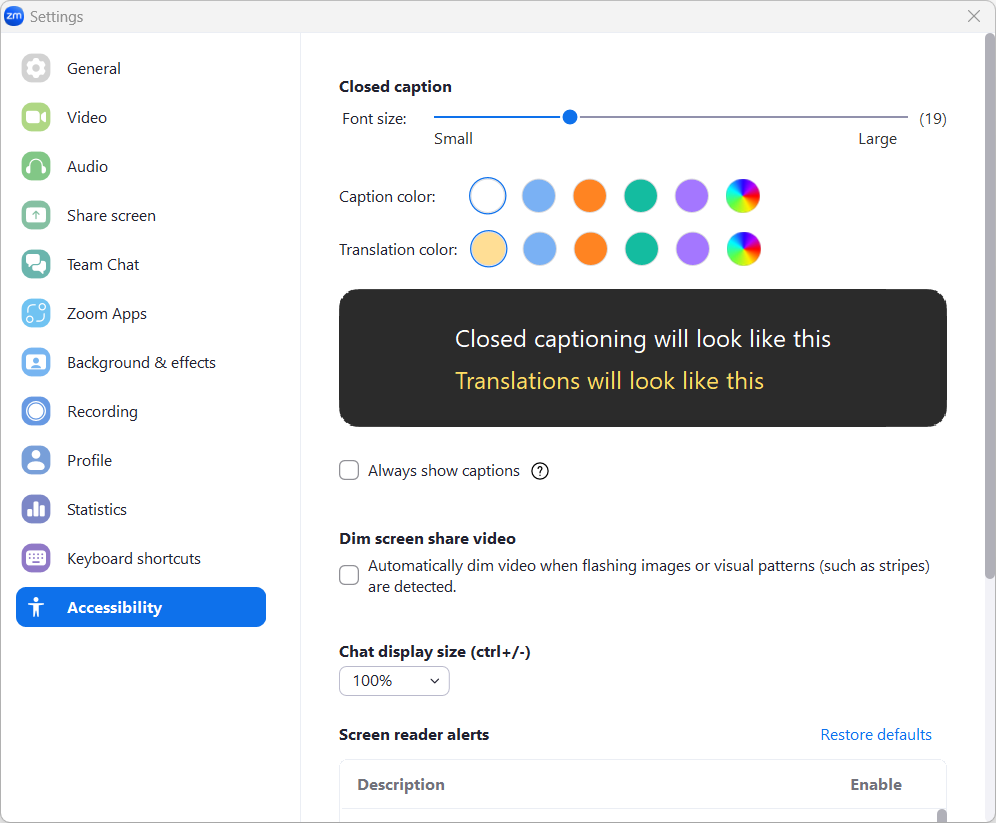
Note that each user's controls are unique, so changes you make here will not affect how others see the captions.
You and your participants can also use the "View full transcript" option to launch a window that displays the full transcript in a scrolling side panel (similar to "Chat") instead of, or in addition to, the captions scrolling across the bottom of the video window.