Advanced Zoom Features & Controls

"Co-Host" vs "Alternative Host"
When you start or schedule a meeting on your Zoom account, you are the owner of that meeting, and will act as its "Host," with the power to record your meetings, invite, admit, remove or deny entry to participants, control who can be seen and heard, who can share, etc.
If you want or need assistance with hosting duties, you have a couple of options.
Co-Host
If you need a hand doing things like monitoring the waiting room, launching polls, sharing content, etc, you can select anyone in the meeting to act as your co-host. Just look for them in the Participants list and choose "Make Co-Host." If you need to leave early, your Co-Host can assume control of the meeting and remain in charge until it ends.
Note that any recordings you make to the Cloud as well as any transcripts or reports from the meeting will be saved to your account, not theirs, because you are still the owner of the meeting. If instead you are recording to your local computer, the recording will end as soon as you leave, so the Co-Host will need to start another recording to their device, to capture what remains of the meeting.
There are a few host permissions that are not available to Co-Hosts. While the Host remains in attendance, a Co-Host cannot:
- Start closed captioning
- Start live streaming
- End the meeting for all participants
- Make another participant a co-host
- Start the waiting room (although a co-host can place participants into an existing waiting room or admit/remove participants from the waiting room)
A Co-Host is also unable to start a meeting, for the obvious reason that they didn't become a Co-Host until the meeting was already in progress. To start a meeting without you, you will need help from another role...
Alternative Host
Like a Co-Host, an Alternative Host shares the permissions of the Host during a meeting, and takes on the full Host role should the Host choose to leave early. However, an Alternative Host also has the power to start a meeting, making it unnecessary for the owner/host to attend at all.
For this to work, the Alternative Host must be named prior to the start of the meeting, and they need to be a member of the VCU Zoom account.
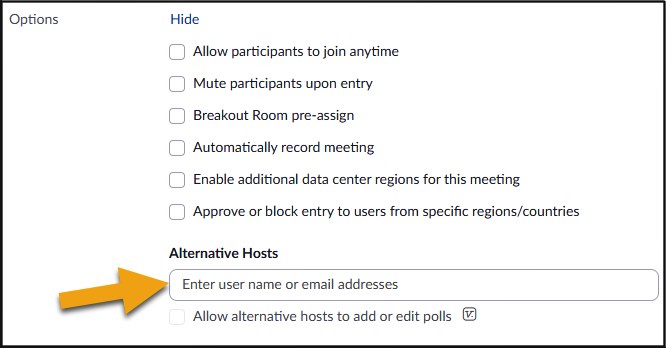
To name an Alternative Host when scheduling your meeting, look for the section marked "Options" and click on "Show."

In the last field, enter the e-mail address of the Zoom user who will serve as your Alternative Host.
If you get a message saying the person you named is not eligible to serve as an Alternative Host, verify with them that they do in fact have a VCU Zoom account. If they don't but are eligible as VCU faculty, staff or student, have them activate an account by logging in at vcu.zoom.us with their eID and VCU password.
Another Option: Share Your Host Key
So what happens if you really need to grant someone else "alternative host" powers for a meeting you cannot attend, but they are not affiliated with VCU?
This can be done by sharing your "Host Key." This is an identifier Zoom uses to recognize you as you, but by sharing it you can let someone else be "you" for the duration of a meeting.
To use this option, follow these steps:
- Log in at vcu.zoom.us and schedule your meeting as you normally would.
- Under "Options" click on "Show" and check the box that allows your attendees to arrive early (5, 10 or 15 minutes). This means the meeting will automatically start as soon as any guest shows up, whether the host is there or not.
- Save your meeting, then go to the "Profile" tab and look for your "Host Key." It will be hidden, but you can reveal it.
- Copy the Host Key and email it to your non-VCU colleague, along with the meeting link.
When your colleague clicks on the meeting link, they will arrive as a normal participant. If they click on the "Participants" icon, they'll see the option to "Claim Host." If they click on that and type in the Host Key you provided, they will become "you" for the duration of the meeting.
If you do end up attending, host duties will automatically transfer to you as soon as you arrive. Otherwise, your colleague will run the meeting for you, with any Cloud Recordings, reports, etc saved to your account.
Obviously, this is an option you'll want to reserve for trusted colleagues. Normally you'll want to keep your Host Key private. If necessary, you can change your Host Key at any time.
Breakout Rooms allow you to split your Zoom meeting into separate sessions. You can choose to manually assign participants to rooms, or let Zoom make automatic assignments. You could also choose to let your participants decide which room to join. You can also pre-assign participants to breakout rooms when you schedule the meeting instead of managing them during the meeting. As a host or co-host, you can move between Breakout Rooms at any time to monitor activity, and/or end the rooms to bring everyone back into the main meeting.
Please note that it's not possible to create Cloud Recordings of all breakout rooms. However, you can assign a facilitator for each room and give them the power to save a recording to their computer.
Zoom supports up to 100 Breakout Rooms per meeting.
The Whiteboard feature lets you collaborate with others before, during or between meetings. When you click on the Whiteboard icon in the meeting toolbar, Zoom will ask whether you want to start a new whiteboard or retrieve an existing one that's already been saved to your account page. If you choose the "new whiteboard" option, then your new whiteboard will be added to the library at the end of the meeting, where it too can be retrieved in future meetings.
Tools are provided to draw, add text, insert images and more. You can start with a blank slate or use a template to organize your whiteboard in the form of a Venn diagram, decision tree, flowchart, pie chart, budget planner, tournament bracket or other format.

You can decide how and to what degree your participants may collaborate on the whiteboard. When you're done, you'll find your boards on your account page under the "Whiteboards" tab, where you can set your sharing preferences for continued collaboration.
You can conduct a poll of your meeting participants using the "Polls/Quizzes" icon in the meeting toolbar. When you click on this, any polls you've created will appear in a list. Choose the one you want to present to your participants and then click on the "Launch" button. Your guests can respond in real time. When they're done, end the poll to see the results. If you like, you can share the results with the group.
To create a new poll, click on the "Polls/Quizzes" icon and instead of choosing from a pre-made poll, use the "+" button to make a new one.
All of your polls are saved to your user account page, where you can access them from the "Surveys" tab. This is also where you can create a new poll before your meeting, so it's ready to use.
Simple polls take the form of a "single choice" question, but you can use the Advanced Polls feature to ask questions with a multiple choice, matching, rank order, short answer, long answer or fill-in-the-blank format.
After your meeting, you can retrieve poll reports under "Reports > Usage Reports > Meeting and Webinar History." Select the date range for your meeting(s) and from the last pull-down menu, select "Has poll data" to see all poll reports.
Here's a video with more details:
If you want to replace your camera image with an avatar, click on the "up" caret next to the "Video" control icon in the meeting toolbar and select "Video and Effects Settings > Avatars."
You can choose from a selection of cartoon animals or click on the "+" button to create a custom "human" avatar. Here you can choose a head and body shape, select the color of your avatar's skin, hair, eyes, etc, add facial hair, glasses, headwear, etc. The avatar will be saved to your library for future use.
![]()
Once enabled, the avatar should mimic your movements, and can even be placed in front of a virtual background from your library.
This page on the Zoom Support site provides more details.
Integrate Zoom with Your Calendar
Zoom offers apps for integration with multiple browsers and Calendar services, allowing you to attach Zoom meeting links to your calendar events.
Google Calendar (on the Chrome Browser)
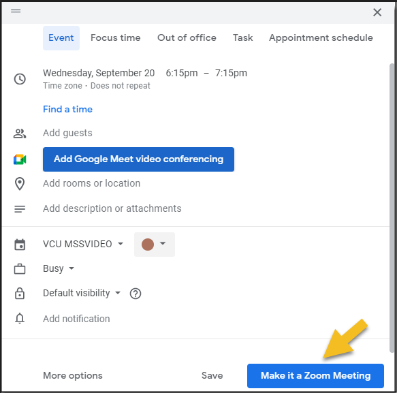
The Chrome Browser Extension adds an icon to your top toolbar. From here you can quickly launch or schedule a meeting without having to visit the Zoom portal page. In addition, whenever you schedule an event in your Google Calendar, you'll get a "Make It A Zoom Meeting" option to instantly add a meeting link. You can launch or join your meeting by clicking on the calendar entry. Your invited guests will see the link on their calendars, as well.
Zoom for Google Workspace offers a fuller range of scheduling options, including the ability to schedule for others (where authorized), assign Alternative Hosts, trigger automatic recordings, etc. This app can be installed from the Apps menu in Chrome; just search for "Zoom for Google Workspace." The Zoom Support page offers more guidance on how to best use the app.
Firefox Browser
If you use the Firefox browser, there is a Zoom Extension for Firefox. Like the Chrome extension, it allows you to start new meetings or schedule future ones via Google Calendar.
MS Edge Browser
The Zoom Edge Extension provides Google Calendar integration via the Microsoft Edge browser.
Microsoft Outlook Plugin
If you don't use Google Calendar at all, Zoom can also be integrated with your Microsoft Outlook calendar using the MS Outlook Plugin.
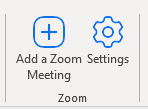
Once installed, use the "Add A Zoom Meeting" button to generate calendar events with Zoom Meeting links. To modify your settings (for example to list an Alternative Host or enable automatic recording), press the "Settings" button to launch a window with all available controls.
Support for additional browsers and calendars may be coming. Any new offerings should appear on the Zoom Download page if and when they become available.
Using Zoom in Canvas
Zoom is integrated with VCU's Canvas LMS via Learning Tools Interoperability (LTI), allowing instructors to schedule, launch and conduct meetings from their Canvas course pages.
To take advantage of this feature, use these helpful links:
Note there are actually two Zoom course tools for VCU Canvas users. Be sure to choose the one that aligns with your VCU Zoom account membership. "Zoom Pro 1.3" is for users on the Main VCU Zoom account, while "Zoom HIPAA Pro 1.3" is for users on the VCU Zoom HIPAA sub-account. Among those assigned to the HIPAA sub-account are the Schools of Medicine, Nursing, Pharmacy, Dentistry and Public Health, the College of Health Professions, the Massey Cancer Center, the VP for Health Sciences, VP for Research, the Department of Psychology and the Partnership for People with Disabilities.
Also note that the Zoom Canvas tool provides you with an "Appointment Book" feature where students can schedule Zoom meetings with you based on your advertised office hours.
Additional information and resources can be found here:
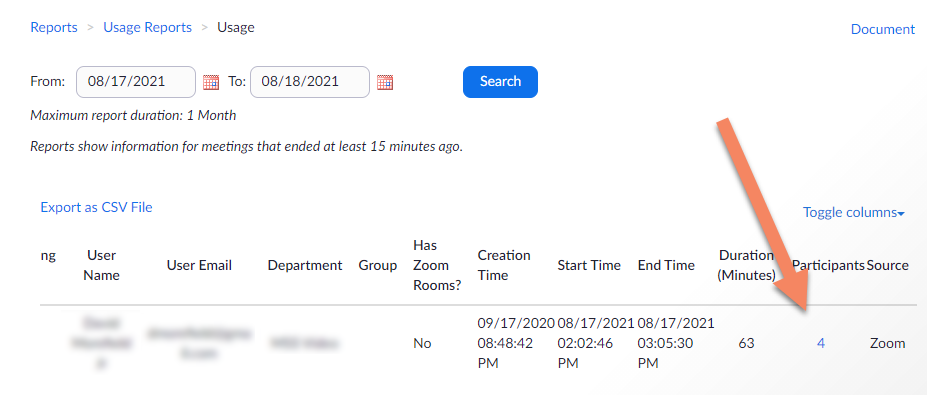
Attendance reports are created for all your meetings. To view or download yours, log in at vcu.zoom.us and click on “Reports” from the left navigation bar. Go to "Usage Reports > Meeting and Webinar History“ to see a list of recent meetings. If the one you want is further in the past, adjust the date range as needed.
Pick the meeting you want and scroll to the right to find the participant total for the meeting. This number is a hyperlink to your participant list. Click on it to see who attended.
If you want to retain a copy of the participant list, use the “Export” option to download it as a .CSV file you can open in a spreadsheet program like Microsoft Excel.
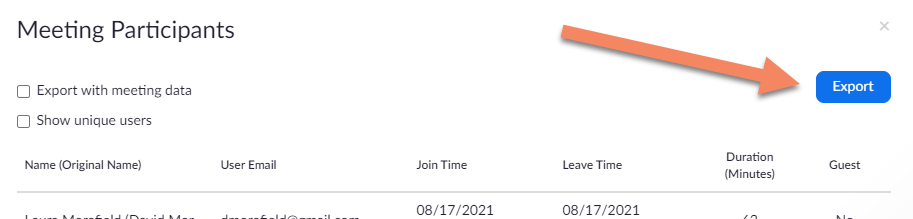
Now you have a list of your meeting participants, useful for tracking class attendance, continuing education credits, etc. If a participant is logged into their Zoom account when they join the meeting, their name will be reported as it appears on their account. If they aren’t logged in, they’ll be prompted to enter a name they want to be addressed by, so results may vary, but their actual email address will be recorded. The report will also show the time they joined, the time they left and the total time spent in the meeting.
Attendance records should be available for meetings going back as far as six months in the past.
You can authorize an assistant or colleague to schedule meetings on your behalf.
To do so, log in to your account at vcu.zoom.us and go to "Settings > Meeting > Other." Near the bottom of the page, you'll see a field for "Assign scheduling privileges to..." Enter the email address of the person you wish to serve as a scheduler for your account. Note: they must be a member of the VCU Zoom account to serve in this role.
Going forward, each time your authorized scheduler goes to create a Zoom meeting, they'll be presented with a choice: Zoom will ask whether they wish to schedule the meeting for themselves or for you (if multiple users have authorized them to schedule, those users will appear on the list, as well). Whatever meetings they schedule on your behalf will appear on your list of "Upcoming Meetings" and not theirs. However as an authorized scheduler, they will automatically be an Alternative Host for all your meetings (even ones they didn't schedule for you).
Also note that depending on which boxes you check when granting them rights, you can allow your schedulers to see Cloud Recordings and/or reports associated with your meetings.
Calling A Hardware Codec
Although Zoom is a software-based conferencing application, it is possible to connect to traditional hardware-based H.323 codecs via Zoom's "Cloud Room Connector" gateway. Here's how:
- Start your Zoom meeting.
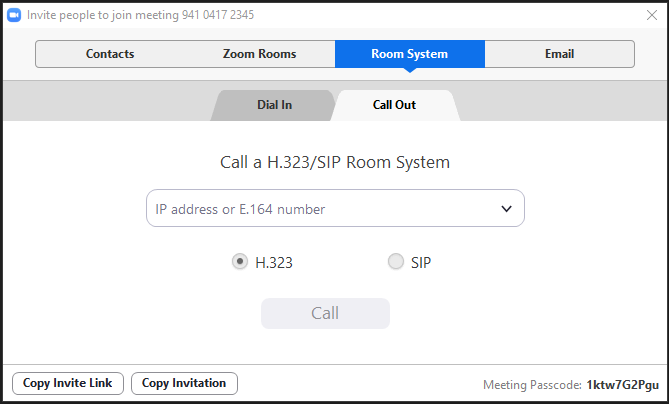
- From the meeting toolbar, choose "Participants" and then use the "Invite" button.
- From the pop-up window, choose the tab marked "Room System".
- Choose the second tab, "Call Out".
- In the field provided, enter the IP address of the device you're calling.
- Hit "Call".
If you know you'll be connecting to the address on a regular basis, you can request to have it added to the Zoom Address Book, accessed via the pull-down menu next to the IP entry field. To request an addition to the address book, please submit an RamsCentral Support Ticket.
It works the other way around, as well; you can join a Zoom meeting by calling from a hardware codec. Here's how:
- Find the Meeting ID number for your meeting. (It should appear next to the meeting name in the "Meetings" tab on your account page and will be 9 to 11 characters in length.)
- On the hardware codec, dial the IP address of Zoom's "Cloud Room Connector" (ex: 162.255.37.11).
- When you get to the Room Connector welcome screen, enter the Zoom Meeting ID number.
NOTE: The invitation emails generated by Zoom will include information on how to join via codec or telephone. Include all details in your invitation to give guests as many options as possible.
Any VCU Zoom meeting can be live streamed to reach an audience beyond the standard 300-participant limit. You can stream to YouTube, Facebook, Twitch or VCU's Kaltura video server.
To use this feature in a meeting, click on "More" (the three dots) in your Meeting toolbar and choose "Livestream" from the resulting pop-up menu.

Choose the hosting platform where you have a streaming account.
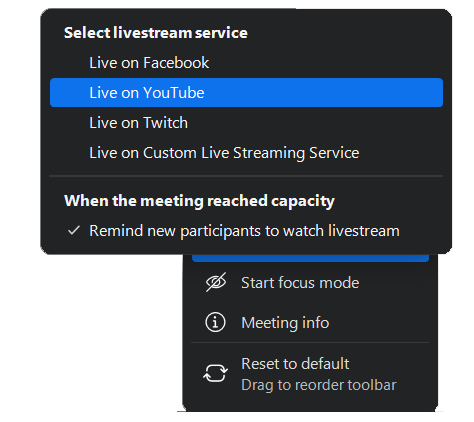
The Zoom Knowledge Base has instructions for streaming your Meetings via YouTube, Facebook or Twitch.
If you don't have a streaming account on those platforms, another option is to use VCU Kaltura to host your streams. Contact us at zoom@vcu.edu and ask us to create a dedicated Live Stream entry for your Zoom account. We'll send you the settings to plug in when scheduling your meeting, including the URL your viewers will use to watch the stream. Then, with your Meeting in progress, go to "More > Livestream > Live on Custom Live Streaming Service" to launch the stream.
Your stream URL is valid for as long as you may need it, so feel free to re-use it as often as you like by adding the settings to any scheduled meeting.
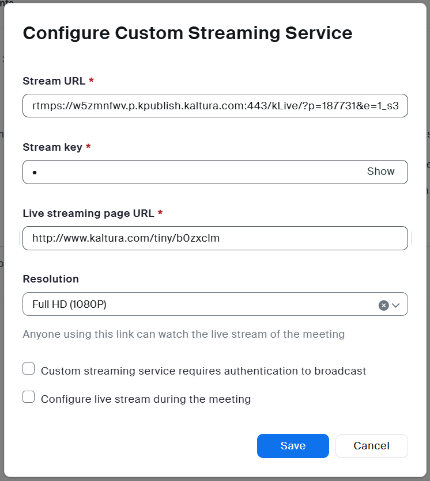
The last value entered ("Live Streaming Page URL") will be the address to share with your viewers.
By default, Zoom will stream at 720p resolution, but 1080p is also supported, so choose this as desired.
Keep in mind that anything viewed in the live stream will be a few seconds behind real time, and anyone watching the stream will be a "passive" viewer without the ability to interact via audio, chat, etc.
Zoom Webinar Feature
Zoom offers an add-on feature called "Webinar" with a slightly different experience from a standard "Meeting."
In "Webinar", only the host and designated "Panelists" can share video and audio, with all other participants interacting via the "Chat" window or the text-based "Q&A" feature. Questions entered into "Q&A" can be seen by the host and panelists, who may choose to respond in a number of ways. By its nature, this format is more secured against disruptions and intrusions from "Zoombombers" but as a trade-off is also less interactive.
A full breakdown of the difference between "Meeting" and "Webinar" is available at the Zoom Knowledge Base.
Please note that the Webinar feature is not included as part of the standard VCU Zoom user plan. A license can be purchased on an annual basis using a departmental budget code at mssvideo.vcu.edu/zoomfeatures.
Technology Services owns a single 500-seat Webinar license that can be leased out to departments on a per-event basis for a nominal fee. This typically involves a two-day rental to cover the actual event plus time to practice and learn the features. If interested, please submit the online request form and we will respond asap.