Frequently Asked Questions

The MSS Video Production & Teleconferencing team in VCU Academic Technologies have compiled this list of VCU Frequently Asked Questions (FAQs), with answers to some of the most common queries from Zoom users at VCU.
How Do I...
Any currently employed VCU staff or faculty member, as well as any currently enrolled student, is entitled to a fully licensed Zoom account. To activate yours, go to vcu.zoom.us and enter your VCU eID and password. You'll receive an email to complete the final activation step.
Once your account is activated you can access it at any time via the above link. If you choose to download the desktop or mobile app, you can use those resources as another way to log in. Be sure to choose the "SSO" (Single Sign-On) login method and enter "vcu" as the account domain to complete the login process via VCU's Central Authentication System.
Instructions for scheduling, hosting and recording Zoom meetings are located elsewhere in this FAQ. Once a user graduates or leaves the employment of VCU, their Zoom account will be retired.
Log into the VCU Zoom portal and go to "Meeting > Schedule A Meeting" to create your meeting, or use the "Schedule" button on the desktop app.
Zoom will prompt you for a meeting title, date and start time. Additional options let you decide who can be seen and heard, whether you want the meeting to be automatically recorded, and more. You can also create a "recurring" meeting that repeats as often as you wish. Use the "Save" button to add the meeting to your list of upcoming events. Zoom will provide you with link to send to guests.
We've provided detailed instructions on a neighboring page.
This video video may also prove helpful:
There are several ways to join a Zoom meeting:
Use the invitation link. If a host has emailed you an invitation, look for the web link displayed under "Join Zoom Meeting" and click on it.
Use the desktop app. Open Zoom Workplace on your desktop and go to the "Home" tab. Any meetings you've scheduled as host as well as any meetings you've accepted an invitation to attend will be listed under "Today." Click on the one you want to join.
Use the "Join" button. On the web portal or in the desktop app, click on "Join" and type in the Meeting ID number.
Use your telephone. If you can only participate via audio, dial the number included in the invitation that was sent to you. The host and other participants will be able to hear you, but will only see a black box with your name displayed in place of a camera view.
When you arrive at the meeting link, you'll be prompted to confirm whether you want to allow Zoom to run the desktop app. Check the box if you want to prevent this dialog window from displaying again.
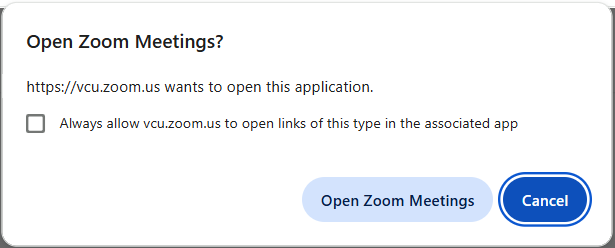
If you prefer not to use the desktop app, or if you don't have it installed and lack the admin privileges to install it on your device, look for the hypertext link that says "Join via Browser." This will allow you to enter the meeting using the web client. Zoom will ask for permission to use your camera and microphone during the meeting.
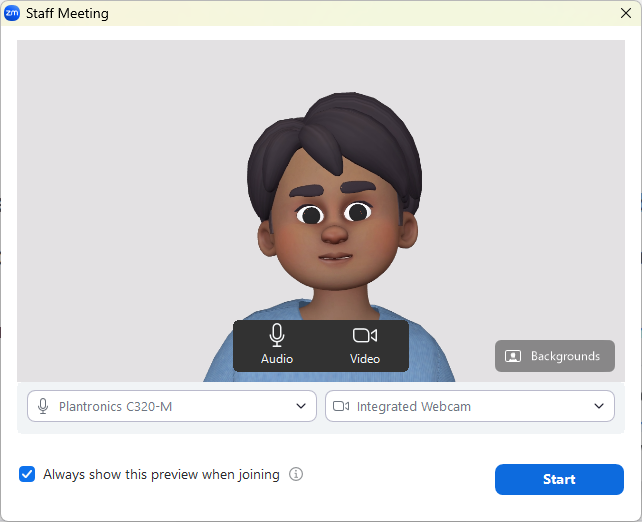
Whichever method you choose to join (unless dialing in via phone) Zoom will ask you to confirm whether the proper camera source is selected and whether you wish to share your camera video at all. You can leave your camera on or off, replace your video with an avatar, and/or apply a virtual background as desired.
Effective security is essential to protect your meetings from unwanted intrusions and disruptions. Working with VCU's Information Security Office, we've created a helpful Security Best Practices Guide.
Additionally, the following video shares tips and tricks for securing your meetings, and your in-meeting options for crisis response and damage control.
Still more information about using and securing your Zoom meetings can be found on the Zoom company website.
Zoom meeting controls can be found in the bottom toolbar of the application window with a meeting in progress. Note that due to space limitations, some functions may be grouped under the "More" heading to keep things tidy. You can customize your toolbar by moving the shortcut icons into or out of the "More" folder depending on which ones you tend to use the most.

We've provided an overview of available controls here.
In addition, Zoom offers a tutorial video explaining how to navigate the user interface:
Meeting hosts and participants see and hear you through your computer's installed or USB-attached webcam and microphone. Controls in the Zoom Workplace app let you choose and customize your video and audio resources.
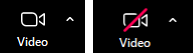
Click on the camera-shaped "Video" icon to start or stop your camera signal. Use the "up" caret next to the video icon to access the settings you need to replace yourself with an animated avatar, apply a virtual background or filter, adjust for low lighting, and more.
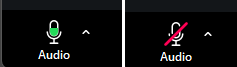
Click on the microphone-shaped "Audio" icon to mute or unmute your audio. If unmuted, you should see a green level indicator moving up and down as you speak. Click on the "up" caret next to the icon to troubleshoot audio issues, perform a quick test of your levels or choose a different microphone.
This video gives an overview of Zoom video and audio settings and operations:
At this point almost any PC or laptop on the market meets the necessary system requirements to support virtual backgrounds in Zoom. This is the feature that lets you insert an image or video behind you in a meeting in place of whatever's behind you in real life. A few more details are provided elsewhere on our site.
This video explains how to select and apply a virtual background in a meeting:
The VCU Brand Site includes a library of approved VCU images for use as Zoom backgrounds. To acquire them, visit brand.vcu.edu, log in with your eID and password, then look under "Downloads > Zoom Backgrounds"
If you're looking for other options, Zoom provides its own library of backgrounds to choose from.
Virtual backgrounds can be loaded from the "Video" control icon in the Zoom Workplace toolbar. This is also where to find "Filters" which work like backgrounds, except they place graphics on top of your camera image instead of behind it. Since adding a cartoon hat or fake beard to your face is rarely appropriate in a business meeting, you may find the most useful filter is the one that adds a "VCU" logo to the upper left corner of your screen. This is another way to "brand" your camera image if none of the official VCU backgrounds appeal to you. Look for the list of filters and click on the one you like to get a preview of how it will display. If you like it, leave it on and Zoom should remember your choice in your next meeting.
Closed captions can be provided for any Zoom meeting. You can either assign a participant to act as your captioner or you can rely on Zoom's automated captions. To access the feature, click on the "show captions" icon in the meeting toolbar.
![]()
Any participant has the option to either show or hide the captions based on their needs. They can also click on the "up" caret next to the icon to access advanced controls to change the font type, size and color as desired. Each participant's viewing preferences will apply only to them and will not affect anyone else in the meeting.
More details are available on this page. You might also find this YouTube video helpful.
Use the "Share" icon in the meeting toolbar to share content from your computer (slideshows, images, videos, documents, web pages, etc). You can share your entire desktop or select a specific open application. You may also choose to share an interactive Whiteboard.
Be sure to look for the checkbox that allows you to include audio in your shares, if applicable. By default, Zoom will avoid sharing audio to eliminate system sounds, notification chimes and other unwanted audio from your computer, but when sharing videos, sound clips, etc you'll want the audio to come through. Also note that under the "Advanced" tab is a choice for "Video," allowing you to use Zoom's native video player instead of a third-party app like VLC player, Windows Media Player, Quicktime Player, etc. When using Zoom's player, audio will be included by default.
This video provides more details on the "Share" feature:
The Whiteboard feature can be accessed via the meeting toolbar. Zoom will ask whether you want to start a new whiteboard or retrieve an existing one. This is because all your whiteboards are saved to your account page, where you and anyone you authorize can collaborate on them during, before or after meetings. If you choose the "new whiteboard" option, then your new whiteboard will be added to the library at the end of the meeting.
Tools are provided to draw, add text, insert images and more. You can start with a blank slate or use a template to organize your whiteboard in the form of a Venn diagram, decision tree, flowchart, pie chart, budget planner, tournament bracket or other format.

You can decide how and to what degree your participants may collaborate on the whiteboard. When you're done, you'll find your boards on your account page under the "Whiteboards" tab, where you can set your sharing preferences for continued collaboration.
You can conduct a poll of your meeting participants using the "Polls/Quizzes" icon in the meeting toolbar. When you click on this, any polls you've created will appear in a list. Choose the one you want to present to your participants and then click on the "Launch" button. Your guests can respond in real time. When they're done, end the poll to see the results. If you like, you can share the results with the group.
To create a new poll, click on the "Polls/Quizzes" icon and instead of choosing from a pre-made poll, use the "+" button to make a new one.
All of your polls are saved to your user account page, where you can access them from the "Surveys" tab. This is also where you can create a new poll before your meeting, so it's ready to use.
Simple polls take the form of a "single choice" question, but you can use the Advanced Polls feature to ask questions with a multiple choice, matching, rank order, short answer, long answer or fill-in-the-blank format.
After your meeting, you can retrieve poll reports under "Reports > Usage Reports > Meeting and Webinar History." Select the date range for your meeting(s) and from the last pull-down menu, select "Has poll data" to see all poll reports.
Here's a video with more details:
Breakout Rooms allow you to split your Zoom meeting into separate sessions. You can choose to manually assign participants to rooms, or let Zoom make automatic assignments. You could also choose to let your participants decide which room to join. You can also pre-assign participants to breakout rooms when you schedule the meeting instead of managing them during the meeting. As a host or co-host, you can move between Breakout Rooms at any time to monitor activity, and/or end the rooms to bring everyone back into the main meeting.
Please note that it's not possible to create Cloud Recordings of all breakout rooms. However, you can assign a facilitator for each room and give them the power to save a recording to their computer.
Zoom supports up to 100 Breakout Rooms per meeting.
Use the "Record" icon in the meeting toolbar to save a recording of your meeting. You'll have the option to record to the Cloud or, if you're on a PC or laptop, to your host device. Please note that Cloud Recordings are only retained for 120 days, so if you want a more permanent copy, either choose "Record to Computer" or be sure to download your Cloud recording before the time limit expires.
The links below include more details, including how to find your recordings and create transcriptions:
There are two ways to create a transcript of your Zoom Meetings.
First, you can choose the "Record to Cloud" option to make a video recording with an attached transcript you can view during video playback and/or download to your computer. To use this option, first go to your account page and under "Settings > Recording > Cloud Recording," be sure to check the box for "Create audio transcript." Note this setting will apply to all future recordings, but it won't help you with a recording you've already made in the past.
The other method is open only to members of the "Main" Zoom account (which excludes faculty, staff and students from departments or schools that may deal with HIPAA-protected data). With Zoom's AI Companion feature enabled in a meeting, Zoom will generate a transcript from which it will compose the Meeting Summary, answer Meeting Questions and/or make a Smart Recording (depending on which of those features the user has enabled). This transcript can be found under "Recordings and Transcripts" on your account page.
To clarify, the first type of transcript requires you to make a Cloud Recording and can be found with that recording, while the second type of transcript requires you to use AI Companion in your meeting, and can be found under the "Recordings and Transcripts" tab. For HIPAA users, that tab will just say "Recordings" (no "Transcripts") so the only option available to them is the Cloud Recording method.
First, it's important to understand the difference between a "Co-Host" and an "Alternative Host." Both share most of the powers of a meeting host, but an Alternative Host has the power to start a meeting without the host, and a co-host does not. Alternative Hosts need to be named ahead of time, and must be members of the VCU Zoom account. Co-hosts can only be named with a meeting in progress, and could come from anywhere.
This page gives more details on how to assign each role.
Waiting rooms are useful tool for keeping your meetings secure. Rather than enter directly into the meeting, guests are placed in the waiting room temporarily where you can see them listed by name and decide when to admit them.
While they wait, they'll see a standard message saying the host will admit them soon. You can customize this view with your own graphics, titles, messages or even a short video. The Zoom Support page provides details on how it works.
Attendance reports are created for all your meetings. To view or download yours, log in at vcu.zoom.us and click on “Reports” from the left navigation bar. Go to "Usage Reports > Meeting and Webinar History“ to see a list of recent meetings. If the one you want is further in the past, adjust the date range as needed.
Pick the meeting you want and scroll to the right to find the participant total for the meeting. This number is a hyperlink to your participant list. Click on it to see who attended.
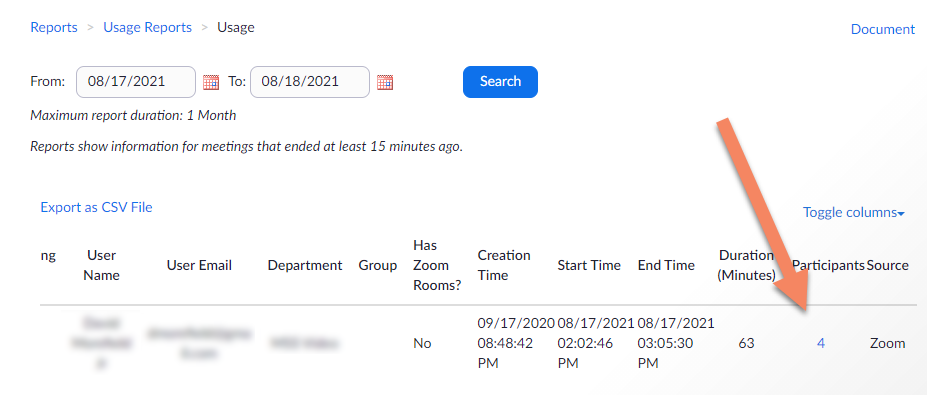
If you want to retain a copy of the participant list, use the “Export” option to download it as a .CSV file you can open in a spreadsheet program like Microsoft Excel.
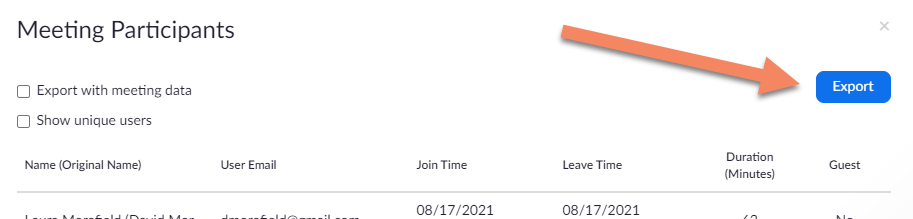
Now you have a list of your meeting participants, useful for tracking class attendance, continuing education credits, etc. If a participant is logged into their Zoom account when they join the meeting, their name will be reported as it appears on their account. If they aren’t logged in, they’ll be prompted to enter a name they want to be addressed by, so results may vary, but their actual email address will be recorded. The report will also show the time they joined, the time they left and the total time spent in the meeting.
Attendance records should be available for meetings going back as far as six months in the past.
If you want to replace your camera image with an avatar, click on the "up" caret next to the "Video" control icon in the meeting toolbar and select "Video and Effects Settings > Avatars."
You can choose from a selection of cartoon animals or click on the "+" button to create a custom "human" avatar. Here you can choose a head and body shape, select the color of your avatar's skin, hair, eyes, etc, add facial hair, glasses, headwear, etc. The avatar will be saved to your library for future use.
![]()
Once enabled, the avatar should mimic your movements, and can even be placed in front of a virtual background from your library.
This page on the Zoom Support site provides more details.
"Webinar" is an add-on feature from Zoom that requires an additional purchase by users. It is not included with a standard VCU Zoom account, but if you wish to add it, you can submit a request using our online form, with the expense charged to your departmental budget code.
If you only need Webinar for a special event, you may wish to rent the license owned by Technology Services, using this form. The cost for a webinar rental is $50 per event, and requests are granted on a first-come, first-served basis.
A full explanation of the difference between Zoom Meetings and Zoom Webinars is available on the Zoom Support page.
Any VCU Zoom meeting can be live streamed to reach an audience beyond the standard 300-participant limit. You can stream to YouTube, Facebook, Twitch or VCU's Kaltura video server.
To use this feature in a meeting, click on "More" (the three dots) in your Meeting toolbar and choose "Livestream" from the resulting pop-up menu.

Choose the hosting platform where you have a streaming account.
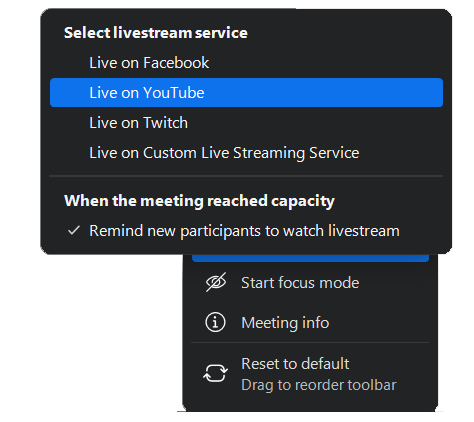
The Zoom Knowledge Base has instructions for streaming your Meetings via YouTube, Facebook or Twitch.
If you don't have a streaming account on those platforms, another option is to use VCU Kaltura to host your streams. Contact us at zoom@vcu.edu and ask us to create a dedicated Live Stream entry for your Zoom account. We'll send you the settings to plug in when scheduling your meeting, including the URL your viewers will use to watch the stream. Then, with your Meeting in progress, go to "More > Livestream > Live on Custom Live Streaming Service" to launch the stream.
Your stream URL is valid for as long as you may need it, so feel free to re-use it as often as you like by adding the settings to any scheduled meeting.
The last value entered ("Live Streaming Page URL") will be the address to share with your viewers.
By default, Zoom will stream at 720p resolution, but 1080p is also supported, so choose this as desired.
Keep in mind that anything viewed in the live stream will be a few seconds behind real time, and anyone watching the stream will be a "passive" viewer without the ability to interact via audio, chat, etc.
Although Zoom is designed as a video conferencing solution, it is possible to join meetings via telephone as an audio-only participant.
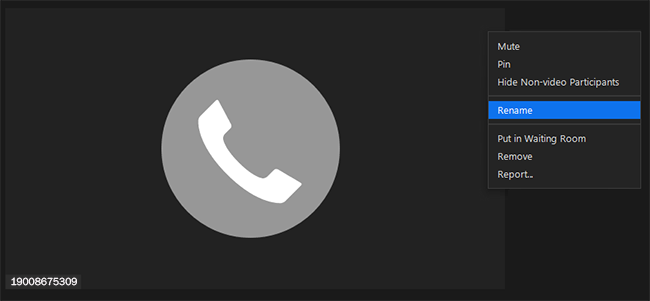
By default, audio-only guests are represented onscreen by a “telephone” icon, with the corner “nameplate” showing their phone number instead of a name.
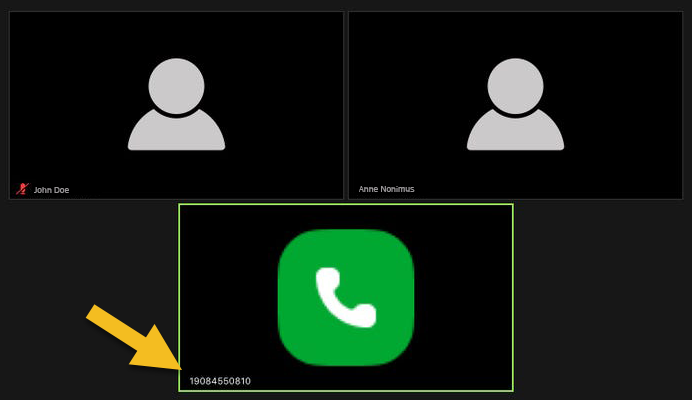
As the meeting host, you may prefer have the person's name shown, either for clarity or to protect the privacy of their number. To achieve this, mouse over the participant’s video window or find them in the “Participants” list, then choose "Rename" to replace their phone number with their actual name.
If you’re a user who regularly joins meetings via your phone, you may want to contact the VCU Zoom admins at zoom@vcu.edu to have your phone number added to a system-wide directory. This way, every time you join a VCU Zoom meeting from your phone, your number is automatically translated to your name.
Zoom's AI Companion feature lets you create AI-powered Meeting Summaries, enable an AI "agent" to answer questions in real time and enhance your Cloud Recordings with "smart chapters," highlights and more.
By default, AI Companion is disabled for your account, but you can enable it at any time; just log in at vcu.zoom.us and go to "Settings > AI Companion." Each feature can be enabled or disabled based your preferences. If you choose to enable Meeting Summaries, a new "Summaries" tab will appear in your left navigation menu. Use it to view and edit your summaries for up to 120 days, after which they will be automatically deleted. You can have AI Companion send a copy to you via email for long-term retention.
You can choose to have AI Companion launch automatically when your meeting starts or (recommended) start it on a case-by-case basis only when you really need it. Please note any meeting participant has the right to ask you to turn off AI Companion features, and you will be able to stop the features with a single click.
More information about AI Companion is available on our dedicated page.
AI Companion provides a number of AI-powered features for use in Zoom meetings, but of course not everyone is a fan of artificial intelligence. By default, AI Companion is disabled for your VCU Zoom account and you need to deliberately enable it for use in your meetings. If you wish to avoid AI Companion in the meetings you host, no action is required on your part; just leave it turned off.
Also please note that any time you attend a meeting where another host is using AI Companion, a notice will display to alert you to the fact. If you'd like to have AIC turned off, you can send a request to the host without any other participants knowing you've done so. Just click on the button that says "Stop AI Companion" to send the request.

If the host turns off AI Companion, you'll see a notice to that effect.
More information about AI Companion is available on our dedicated page.