Create and Manage Zoom Meetings

Schedule a Meeting
 To schedule a Zoom meeting, log into the portal at vcu.zoom.us and under the "Meetings" tab, click on "Schedule a Meeting."
This will create an event page where you can customize your meeting settings as desired.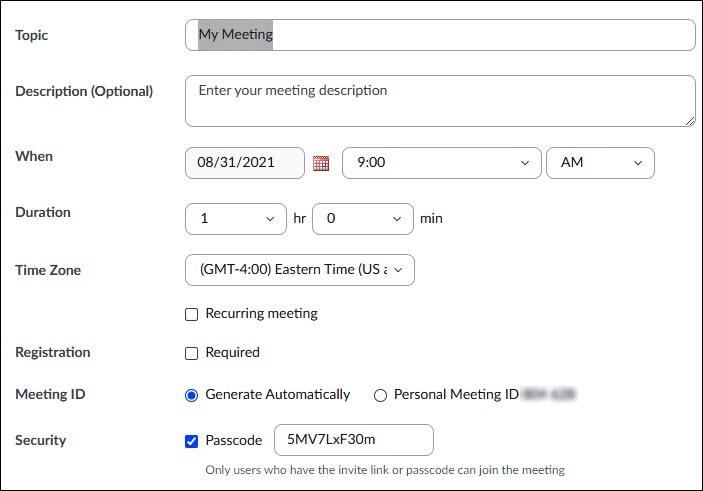 First, you'll want to give your meeting a name to make it easier to keep manage. It could be a course title like PSYCH 101, or something descriptive like "Interview with John Smith." If you're in a hurry, the default title "My Meeting" will do, but if you have a schedule full of meetings with that same name, things could soon become confusing.
Next, enter the date and time for your event. Note that by default, the meeting duration is set to 1 hour, but this does NOT mean your meeting will be cut off after an hour. It's just a default "estimate" to be used in the invitations you send to your guests. You can modify it as needed.
The "recurring meeting" option is useful for assigning a single Meeting ID to a series of events, like a semester-long class. You have multiple options: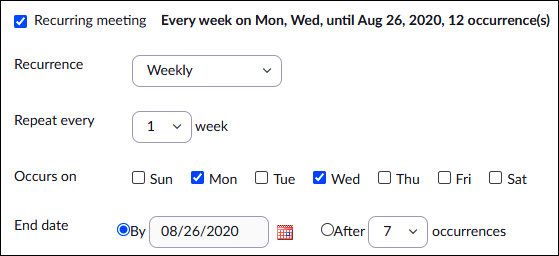 Set the meeting to recur on a daily, weekly or monthly basis on as many days of the week as you need. For the end date, either plug in the last date you intend to meet or specify the number of times you want the event to repeat. (If you want the event to persist indefinitely, then instead of "Daily," "Weekly" or "Monthly," choose "No Fixed Time.") You'll end up with a single link that applies to all meetings, so you and your guests have only one link to keep track of, instead of lots of them. On your "Meetings" tab, you'll see a listing for each meeting occurrence, but all of them will have the same Meeting ID number and "Join" link.
Note: You have the choice of either assigning a unique, randomly generated ID number to your meeting or using your Personal Meeting Room number (which never changes). Unique numbers provide greater security, but doing everything in your PMR takes any guesswork out of where to find your meeting. You decide which option to take.
It's always good practice to apply a passcode to all your meetings, to protect against disruptions from uninvited troublemakers. Zoom will provide a randomly generated passcode, but you can create your own if you like. It just needs to be at least 10 characters long.
There is an optional Waiting Room feature that adds another layer of security. With this turned enabled, your guests will be held aside in a waiting room and you will be able to and pick and choose those persons you wish to admit.
To give a colleague the rights to host your meeting in your absence, add them as an Alternative Host when you schedule the event.
You can also give a colleague the rights to schedule meetings on your behalf. Log into your account page and under "Settings > Meetings," find the field (near the bottom of the page) that says "Assign scheduling privileges to..." and add their email address. The next time they schedule a meeting, they'll be prompted to choose whether the meeting is for themselves or for you. Anything they schedule for you will show up on your "Upcoming Meetings" list, and not theirs.
Integrate Zoom with Your Calendar
Zoom offers apps for integration with multiple browsers and Calendar services, allowing you to attach Zoom meeting links to your calendar events.
Chrome Browser
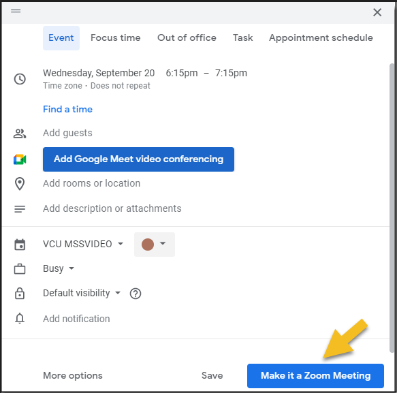
The Chrome Browser Extension adds an icon to your top toolbar. From here you can quickly launch or schedule a meeting without having to visit the Zoom portal page. In addition, whenever you schedule an event in your Google Calendar, you'll get a "Make It A Zoom Meeting" option to instantly add a meeting link. You can launch or join your meeting by clicking on the calendar entry. Your invited guests will see the link on their calendars, as well.
Zoom for Google Workspace offers a fuller range of scheduling options, including the ability to schedule for others (where authorized), assign Alternative Hosts, trigger automatic recordings, etc. This app can be installed from the Apps menu in Chrome; just search for "Zoom for Google Workspace." The Zoom Support page offers more guidance on how to best use the app.
Firefox Browser
If you use the Firefox browser, there is a Zoom Extension for Firefox. Like the Chrome extension, it allows you to start new meetings or schedule future ones via Google Calendar.
MS Edge Browser
The Zoom Edge Extension provides Google Calendar integration via the Microsoft Edge browser.
Microsoft Outlook Plugin
If you don't use Google Calendar at all, Zoom can also be integrated with your Microsoft Outlook calendar using the MS Outlook Plugin.
Support for additional browsers and calendars may be coming. Any new offerings should appear on the Zoom Download page if and when they become available.
Using Zoom in Canvas
Zoom is integrated with VCU's Canvas LMS via Learning Tools Interoperability (LTI), allowing instructors to schedule, launch and conduct meetings from their Canvas course pages.
To take advantage of this feature, use these helpful links:
The above links and others will display when you access the Zoom integration from your VCU Canvas course pages. If you want to dive more deeply into what's possible through the Zoom/Canvas integration, additional resources can be found here:
"Co-Host" vs "Alternative Host"
When you start or schedule a meeting on your Zoom account, you are the owner of that meeting, and will act as its "Host," with the permission to invite, admit or deny entry to participants, control who can be seen and heard and who can share, record, etc.
If you want or need assistance with hosting duties, you have a couple of options.
Co-Host
If you need to leave the meeting early, whoever you've made a Co-Host can remain in charge for the duration of the event. Note, however, that if you're recording to your local computer, your recording will end when you leave, so the Co-Host will need to start another recording to their device, to capture what remains of the meeting. If you're recording to the Cloud, that recording will continue even after you leave, and at the meeting's end it will be delivered to your account, not the Co-Host's.
Please note there are a few host permissions that are not available to Co-Hosts. While the Host remains in attendance, a Co-Host cannot:
- Start closed captioning
- Start live streaming
- End the meeting for all participants
- Make another participant a co-host
- Start the waiting room (although a co-host can place participants into an existing waiting room or admit/remove participants from the waiting room)
A Co-Host is also unable to start a meeting, for the obvious reason that they didn't become a Co-Host until the meeting was already in progress. To start a meeting without you, you will need help from another role...
Alternative Host
Like a Co-Host, an Alternative Host shares the permissions of the Host when the Host is in attendance, and takes on the full Host role when the original Host is absent or has left. However, an Alternative Host also has the permissions to start a meeting, so the owner/host need not attend the meeting at all.
For this to work, the Alternative Host must be named prior to the start of the meeting, and they need to have a VCU Zoom account.
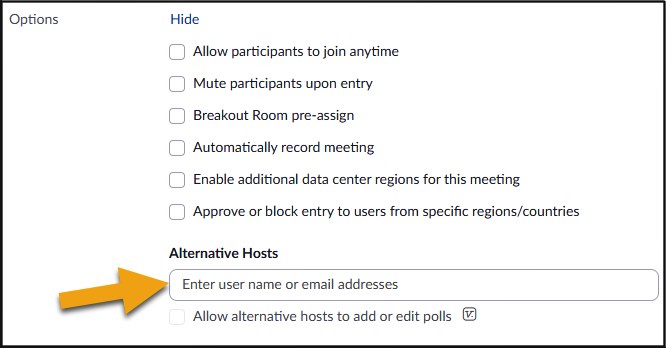
To name an Alternative Host, schedule your meeting on vcu.zoom.us, look for the section marked "Options" and click on "Show."

In the last field, enter the e-mail address of the Zoom user who will serve as your Alternative Host.
As with a Co-Host, your Alternative Host is still conducting the meeting on your account, so if a Cloud Recording is created, that recording will still be saved under your account. Likewise, only you as the meeting owner will be able to see and download Registration and/or Attendance Reports associated with your meeting.
Another Option: Share Your Host Key
So what happens if you really need to grant someone else hosting permissions for a meeting you cannot attend, and that person is not affiliated with VCU?
This can be done by sharing your "Host Key." This is an identifier Zoom uses to recognize you as you, but by sharing it you can let someone else be "you" for the duration of a meeting.
To use this option, follow these steps:
- Log in at vcu.zoom.us and schedule your meeting as you normally would.
- Under "Options" click on "Show" and check the box that allows your attendees to arrive early (5, 10 or 15 minutes). This means the meeting will automatically start as soon as any guest shows up, whether the host is there or not.
- Save your meeting and go to the "Profile" tab. Look for your "Host Key." It will be hidden, but you can reveal it. Copy the Host Key and mail it to the colleague you want to fill in for you as host.
When your colleague uses the meeting link, they will arrive as a normal participant. If they click on the "Participants" icon, they'll see the option to "Claim Host." They need to click on that and type in the Host Key you provided, then they will become the host.
If you do end up attending, you'll take over host duties as soon as you arrive. Otherwise, your colleague will run the meeting for you, and if they opt to record to the Cloud, the recording will be saved to your account.
Obviously, this is an option you'll want to reserve for trusted colleagues. Normally you'll want to keep your Host Key private. If necessary, you can change your Host Key at any time.
Captions and Live Transcription in Zoom
Closed captions can be generated in real-time for any VCU-hosted Zoom Meeting. Users are encouraged to make use of this feature to create a more inclusive and accessible experience for participants.
By default, all VCU Zoom users have the closed captioning feature enabled, but here's how to verify it's enabled for your account:
- Sign in to the VCU Zoom web portal (vcu.zoom.us).
- In the navigation menu, choose "Settings > Meeting > In Meeting (Advanced)."
- Verify that both "Manual captions" (including both boxes under it) and "Automated captions" are enabled.
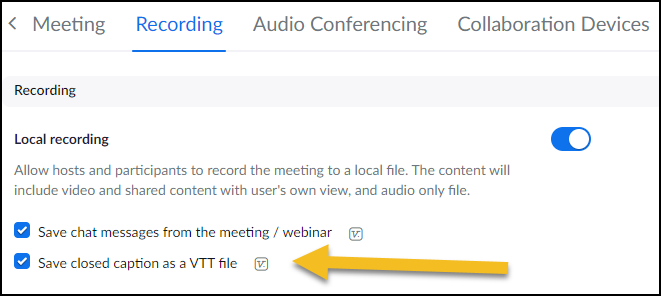
- Go to "Settings > Recording > Local Recording" and check the box for "save closed caption as a VTT file" to have the file saved to your computer
- Under "Settings > Recording > Cloud Recording", check the box for "save closed caption as a VTT file" to have your transcripts saved to the Cloud.
The above settings will create your captions and transcripts on cue, but as the meeting host, you still need to trigger their creation during the meeting. Just choose "Show Captions" from the Zoom toolbar and indicate the language that will be spoken in the meeting.
If your participants can't see the captions, ask them to click on "More" and choose "Display Subtitles".
If you want to change the size or color of the captions, you can do so by using the caret next to the "Show Captions" button to access "Caption Settings".
Use the slider control to see a preview of the font size and choose what works best for you.
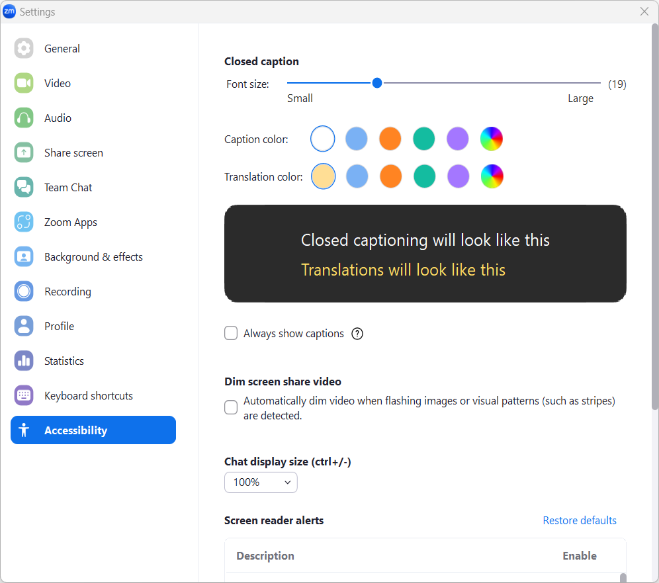
Note that each user's controls are unique, so changes you make here will not affect how others see the captions.
You and your participants can also use the "View full transcript" option to launch a window that displays the full transcript in a scrolling side panel (similar to "Chat") instead of, or in addition to, the captions scrolling across the bottom of the video window.
A Note About Streaming
Remember that when streaming your Zoom Meeting or Webinar via Facebook, YouTube, Twitch or a custom streaming service, you could be reaching a much larger audience, which increases the likely need for captions.
Whenever you launch captions in a Zoom meeting, they will be included in the live stream you send to these platforms, for the benefit of all viewers.
Zoom Meeting Controls
Once you've launched your meeting, you'll see a number of options on the bottom toolbar:

 "Join Audio"lets you connect via your PC or telephone. Use the caret to the right of the audio icon to select your microphone and speaker, if you have more than one of either. Once you've joined, the "headphones" icon will change to a "microphone" icon and you'll be able to mute and unmute yourself as desired.
 "Start (and Stop) Video"controls the image you're sending to the meeting. Use the caret next to the camera icon to select your desired camera, if you have more than one.These settings are also where you can select and apply virtual backgrounds and filters.
 "Host Tools" provides quick links to all your security settings, including but not limited to removing participants, muting participants, locking the meeting, creating a new waiting room and granting or removing your guests' ability to unmute themselves, share content, make recordings, etc.
 "Participants" opens a window to show you a complete list of who's currently in your meeting. An "invite" button at the bottom of this window lets you invite additional guests via email or your Zoom Contacts list. You can also select individual participants to promote them to host, mute their audio, move them to the waiting room, etc.
 "Chat" opens a window to show the full chat history of your meeting as it unfolds. With this window closed, you will see new chat messages as "word balloons" that pop up at the bottom of the screen. In the Chat window, you can click on the "..." button for the option to save your chat as a text file.
 "Share Screen" connects you with all your sharing options, including but not limited to: your full desktop or portions thereof, individual applications, video from a second camera, computer audio or playback of a recorded video clip.
 Use "Record" to make an MP4 recording of your meeting. You'll be given a choice between recording to your host device or to the Zoom Cloud servers. Note that the recording may take a little time to process after the end of your meeting, but when it's done Zoom will show you where on your hard drive it was saved. Cloud recordings can be found on your account page under the "Recordings" tab.
 "Polls/Quizzes" provides access to pre-made polls you've attached to your meeting, or lets you create new polls with the meeting in progress, launch them, collect results and share those results with your participants. Various questions types are covered, including multiple choice, matching, rankings and short and long answers.
 "Show captions" displays closed captions in real time to comply with ADA standards. Captions are displayed at the bottom of your video image, and/or you can opt to have the entire transcript displayed in a side window. Each participant can customize the display to show captions in the size and color that works best for them.
 "Breakout Rooms" lets you organize your participants into sub-groups and "send them off" for side discussions. As host, you can enter and leave any breakout room to see how things are going. You can also type in messages to send to all the rooms.
 "Whiteboards" lets you start and share a new whiteboard or access an existing whiteboard from your library. Multiple templates are provided including org charts, Venn diagrams, maps and more. Depending on your settings, participants can annotate on the boards in real time and save them.
 "Reactions" provides participants with a way to provide non-verbal feedback in picture form to "applaud," give a thumbs-up, smile, ask a presenter to speed up or slow down, etc. This is where guests can find the "Raise Hand" option so you know to unmute them to take their questions.
 "Notes" is similar to "Whiteboards" in that it lets you create a page of notes or retrieve premade notes where you and your participants can collaborate to organize your thoughts and ideas. Multiple font styles, sizes, weights and colors are supported.
 "Apps" gives you access to any apps you've added to your account. Apps created and offered by Zoom will be found here, but many other 3rd-party apps will not be offered if they may violate VCU's security policies or require protected user information to function.
 "More" is a catch-all for all the features that can't fit in your toolbar. You can drag and drop your most-used icons from here onto the toolbar and file less-used features under "More. This is also where you'll find the controls to start a live stream or start "Focus Mode."